Thursday, December 31, 2015

Curling scarf rescue mission--part four: lining the scarf

This TECHknitting series on curing curling stockinette scarves has looked at the problem, at solutions which don't work, and at two solutions which do work:  drop-columns and transforming stockinette into ribbing

poster child for stockinette curl
Today's poster child for curling is a multi-blue scarf.   Although you can't tell in its wound-up state, this scarf has two tapered ends and an applied edging.  Drop columns or forming ribbing would mean taking off, then reapplying the edging and unraveling, plus re-knitting one whole end--a LOT of work.  Further, with no excess yarn in stash, re-knitting and re-edging is a doubtful proposition: every inch of un-picked and unraveled yarn would have to be in perfect shape after unkinking for this scarf to come back together. Very risky!

Of course, this isn't the only sort of scarf which cannot be fabric-reworked.  Below are two other scarves-- a cheerful, beautifully-designed flower intarsia scarf and a lace scarf--which would be ruined by drop columns or ribbing. Luckily, however, all of these scarves have had their curl straightened by this post's solution: lining.

Stockinette curl cured with a polar fleece lining
LINING--materials
TECHknitting blog has already featured several tutorials for lining knitted garments--hats in headband style and in fully-lined style, mittens with side thumbs and front thumbs.  The lining recommended in those posts is polar fleece--a wonderful fabric which does not unravel when cut, so no hemming is required.  Also, polar fleece stretches--highly compatible with a stretchy fabric like knitting. However, polar fleece is not suitable to lace in style or elegance.  Therefore, this post also shows a lace scarf lined in silk.

LINING--how to
Here's how the multi-blue scarf was lined.  The first step was to steam-block the scarf.  This made it lay as flat as possible.  The scarf was then pinned to a big piece of cardboard to be measured--the pinning was necessary because measuring a scroll is impossible.  The lining material was cut a bit big, and then sewn in, turning a tiny bit of the fabric under as the sewing went along.  The work was done using ordinary polyester sewing thread and the overcast stitch. The fuzz on polar fleece rises up to hide the stitches, so if your sewing is not technically polished, no problem--the sewing is really truly invisible on the finished project. 

Unlike the little stitches illustrated in the post on overcast stitches, the stitches on the multi-blue scarf are rather large: one sewing stitch per each knitting stitch of the edging.  The thread was used doubled, and the needle was inserted between the yarn plies of the innermost line of edging stitches.  It would be possible to simply insert the thread under one arm of the knitting stitch, as well--whether to take the sewing needle through the plies of each knit stitch or under one whole strand of each knit stitch is a matter of personal preference.

The colorful and cheerful intarsia scarf shown below was knit by Sandra Woods, (Passionateknittr on Ravelry) and the photos are used by her permission. (Many thanks, Sandra!)

Intarsia scarf before lining--all rolled up

The before and after shows that lining was really the only option here.

Intarsia scarf after lining with polar fleece

Further, the lining on an intarsia scarf does more than simply cure the roll.  First, the floats on the back are hidden.  Second, the many ends can be securely fastened without having to make the back pretty. Finally, the bright red color of the polar fleece lining adds a strong design element.  A completely different effect would have been obtained, for example, by using a different color.  This opens design possibilities.  Matching scarves could be made for two sisters, say, of different temperament and personality.  Each scarf could be identical in the knitted work but quite different in finished effect via different colored linings.

Cotton lace lined with silk
The cotton lace scarf to the left was lined with silk.  Unlike polar fleece, silk is a woven fabric which must be hemmed after cutting and before being stitching in place on the scarf-back.  I hemmed the silk by hand, folding the edge under twice and backstitching the hem in place.  The hemmed silk lining was then overcast-stitched in place on the back of the cotton scarf, with the hem line on the inside, hidden forever against the purl face of the scarf being lined.  As you can see, this scarf was lined in a contrasting color--orange china silk on a fuchsia scarf. (Polyester lining or poly-silks work, too!) Thus, the lining not only cured the stubborn curl, but added an strong design element. Other views of this scarf can be seen here.  Addendum, 1-17-2011:  Lisascenic on Ravelry has kindly allowed me to link to her silk lined scarf, on which the lining was sewed differently--sewed over the edge of the knitting, which gives a very interesting look, too, almost like a knit-lined silk scarf!

Of course, linings are not restricted to hand-knit masterpieces such as intarsia or lace: they work very well in utility situations also.  On the last post, Fibercrafter-Sally left a comment about using a knitting machine to make simple stockinette scarves for charity.  Stockinette rectangles could be made on a knitting machine, then cured of their curl by being lined with polar fleece.  If the polar fleece lining were stretch-stitched on by sewing machine, these kind of machine-knitted scarves could be churned out by the dozen.  Some nice effects could obtained by the contrast between the yarn and the linings (and think of the matching lined flip-brim hats which could be made...)


Summary
The series started with three curly scarves, and ended with three flat scarves.
Before--three curly scarves


After--cured of their curl, hanging

After--cured of their curl--closeup


After--cured of their curl, laying flat showing front and back

With best regards for a happy and healthy new year--TK
* * *
This is part 4 of a four part series.  The other posts are:
Curling scarf rescue mission, part 1: the problem and the solutions which don't work
Curling scarf rescue mission, part 2: the drop-column method
Curling scarf rescue mission, part 3: transforming stockinette into ribbing

Ever have one of those days?


--Techknitter
R2D2 knits
R2D2 knitting

Goodbye 2008


Just taking a moment to wish all the folks that come here a healthy and satisfying 2009.

Looking Forward
2009 looks to be filled with some large challenges, but there is also a lot of hope and energy to go along with it. My biggest wish is that the groundswell of support that President-elect Obama got while he ran for office, continues on through his eight years of leading this country.

Here are some personal things I'm looking forward to:

- Finishing the stranded sweater before Winter is over
- Having the second annual Men's Spring Knitting Retreat in May
- Having another successful work year (I'll be heading down South a lot in 2009)
- Reaching the half-century point in my age

I'll have to see about adding to this list later.

Current Knitting
I have to admit that I took a short rest from knitting after finishing Henry, but it wasn't long before I dragged out the stranded sweater and tried to figure out where I had left it.

For those of you who forgot as well...I was about to start the detail around the short button band. I really needed to plot this one out before I could knit it, so I came up with this in Excel.


In intended to do a steek in the center of this to create the no-button button band. Here's where I've gotten so far.


It was nice to take a break...I'm enjoying knitting the sweater a lot more now that I've had something else to work on for a bit.

Readers' Comments/Questions
A reader contacted me privately to let me know that flashing graphics, like the daily mug shot composite can wreak havoc with folks with epilepsy or are prone to visually triggered seizures. As a result, if folks care to see my daily mug shot, they'll have to go to that site to see it.

JellyDonut asks, "One question--was there a need to block Henry? I have not worked with Malabrigo yet."

I washed the scarf, removed all visible cat hairs and laid it out on a towel with light blocking. The ends of the scarf are a bit wider than the mid-section, so I adjusted that, but it easily could have gone with no blocking at all.

Wednesday, December 30, 2015

Are We Trying To Make Enemies?


When Bush hitched his wagon to the Musharraf camp in Pakistan, and stuck to his guns (so to speak), mightn't he have possibly expressed some concern about the safety of Benazir Bhutto?

Still Sticking
Even with the shocking assassination of Bhutto, this administration still refuses to even acknowledge that they might have possibly made another alliance mistake.

As all the television pundits trample over the despair and bereavement of Ms. Bhutto's killing to discuss the impact of her death on the U.S. primary caucus in Iowa, they keep asking which candidate is more prepared to deal decisively with this kind of diplomatic nightmare. I haven't heard one of them mention how ill-prepared the current president is to deal with the situation.

On a related note, I am asking myself why the assassination of a woman seems so much more awful to me than a similar male assassination might have been. I would like to believe that if a man had been so outspoken and critical of the Musharraf dictatorship in Pakistan, that his assassination would have been equally as shocking to me, but I'm not sure that's true.

Current Knitting
Not wanting to commit to a large, complex project, I decide to focus on the pair of mittens using the remaining Alpaca Herd Jacket yarn.


Thaddeus sniffed dubiously at the idea of mittens, so they morphed into gloves. I worked them on the fly, so they're not perfect, but the look acceptable and they sure are warm. As you can note from the "in progress" picture, the gloves (including each finger) was knit in the round on double-pointed needles.

Readers' Comments/Questions
Kenny bemoans all the "knitting porn" in my last post, and then asks, "BTW, do you like my new hat?"

Yes, very much. If folks haven't gone out to see it, you should. For his first design, it is very nicely done.

Adam Spector Hodgkins Memorial Fund

Sharps and flats: sewing needles, part 2

Way back in May 2007, TECHknitting had a post on the two types of sewing needles: blunt pointed and sharp pointed.  The point (ha!) was that each kind has a different use.  Blunt points are best for such tasks as weaving, where you don't want to split the plies of the underlying yarn. Sharp points work well for splitting plies, good for such jobs as skimming in ends.

Although each type is good at what it does, the truth is that it can get rather tiresome having to switch back and forth, for example: first threading to a blunt point for weaving in an end, then rethreading to a sharp point to skim in the last nub of the tail.  The temptation is to skimp and just muddle through with whatever kind of needle comes to hand first.

Recently, Patti from Canada was reviewing this old post.  In response, she sent her own little trick to avoid needle switching.  Her e-mail reads as follows:

If you need to use both kinds of needles, 
it is easiest to thread onto a sharp needle, and 
> then just push it wrong way around
(eye first instead of point first) 
in those places you need the blunt point.
> Just be careful not to stab yourself.

What a swell idea!  No more muddling, no more skimping!

Weaving with a sharp needle held wrong way around

Close up

No need to rethread onto a sharp point
when the time comes for skimming in


Using a sharp needle backwards: really very clever! (And I will try not to stab myself.)  Thanks, Patti.

--TK

Tuesday, December 29, 2015

Zig-zag bands

includes 7 illustrations. Click any illustration to enlarge
Knitting better bands the TECHknitting way:
ZIG-ZAG BANDS
Way back in October, as this series on better bands and cuffs started, I told you that garter stitch does not curl. (Neither does seed stitch. Neither does ribbing.) Yet you know from experience garter stitch bands on a stockinette fabric DO curl. You see, it is the stockinette fabric to which the bands are attached which curls. (For more about WHY stockinette curls, click here.) The end result is that the bands on your scarf, sweater or afghan are prone to flipping AND curling.

So far in this series, many cures have been recommended: rolled edges, or seaming the garment or steam blocking and/or ironing. Today, yet another recommended cure: zig-zag bands.

The fact is, that bands want to curl along the edge where the bands meet the stockinette. If you break up the line, you'll have less curling. The same is true about flipping: If you break up the line where the band meets the stockinette fabric, you'll be less likely to have flipping.As you can see, the scarf in the photo above is a stockinette stitch scarf with a garter stitch border all around. Yet, the scarf does not curl, and the borders do not flip, and here is why:
  • The rolled stockinette edge along the bottom of the garter stitch horizontal (bottom) band adds stability--by curling up so markedly, the rolled edge counteracts the inward curl of the stockinette fabric in the middle of the scarf.
  • Zig-zag bands both vertical and horizontal, where the garter stitch meets the stockinette stitch. By interlacing areas of garter stitch and stockinette, the "fault line," for flipping/curling is eliminated
  • A slipped selvedge helps prevent future ruffling along the outside vertical edges of the garter stitch border. (Click here for more info about slipped selvedges.)
  • Also, the scarf has been steam blocked.
Due to these four tricks, the scarf photographed above does not curl very much, and nor does it flip. Below is a close up of the corner, showing details of the curled bottom edge knitted in stockinette which rolls up below the garter stitch part of the bottom band, a bit of the zig zag design in the garter stitch part of the bottom band and a bit of the the zig zag side edge.One more close-up for good measure:


* * *
Here are two diagrams showing how to make these non-curling bands. The diagrams show garter stitch, but you can readily adapt these for seed stitch.

* * *
One last note: The zig-zags have to be in proportion to the amount of stockinette stitch in order to provide a non-flipping edge. An empirical rule of thumb seems to be that ON A GARMENT WITH TWO EXPOSED EDGES (SCARF, AFGHAN) the peaks have to extend approximately 10-15% of the way into the stockinette along each edge you want to prevent from rolling, in order to prevent flipping. So, in a a 250 stitch afghan knit all in one piece, for example, that would be a side zig-zag which protruded 25 to 38 stitches into the stockinette at the tip of each peak, along both vertical edges. The bottom edges also have to have zig-zags with peaks just as high as the side zig-zags in order to prevent flipping. Obviously, the wider/higher you make the tip of the peaks, the less likely is flipping, but the minimum seems to be about a 10-15% protrusion. Of course, that means that you have to adapt the above two diagrams to the width of your garment.

FOR THE FRONT BANDS OF A CARDIGAN (one exposed edge), a rule of thumb seems to be that peaks extending about 1.5 or 2 inches into the stockinette will do the trick, and this is true regardless of gauge or yarn weight.

* * *
This is part 7 of a series. The other posts are:
How to knit better bands and cuffs, part 1: Opera and Soap Opera (November 1, 2007)
*How to knit better bands and cuffs, part 2: Why cuffs and bands are wonky, and what to do about it (November 14, 2007)
*How to knit better bands and cuffs, part 3: Hems and facings:(November 22, 2007)
*How to knit better bands and cuffs, part 4: Knitting shut hems and facings (December 9, 2007)
*How to knit better bands and cuffs, part 5: Sewing shut hems and facings (December 23, 2007)
*How to knit better bands and cuffs, part 6: Your steam iron: a mighty weapon in the fight against curling and flipping (December 25, 2007)
*How to knit better bands and cuffs, part 8: Provisional tail method of 1x1 tubular cast on (January 11, 2008)
*How to knit better bands and cuffs, part 9: Tubular cast off for 1x1 ribbing (it's pretty) (January 15, 2008)
*How to knit better bands and cuffs: the wrap-up (January 23, 2008)

--TECHknitter
(You have been reading TECHknitting on: zig-zag bands)

Reworking an old sweater: a job for the Garde Tricot

In classic French cuisine, one of the standard kitchen positions is called garde manger, which translates literally into "guard of the food."  Among other things, the Chef garde manger is responsible for taking significant leftovers, such as an excess of lobster, and turning it into a cold dish to be served again another day in different form.  In knitting, when a garment has come to outlive its original purpose, I think there should be a garde tricot--a guard of the knitting--who reworks the knit garment into something which can be worn again another day.

Here we have an old gray sweater, made in the infancy of my knitting career (I saw with interest that this was actually the first garment I ever made with jogless stripes

Before "garde-tricot" treatment

After "garde-tricot" treatment

Although this sweater was much worn in its day, the person-for-whom-it-was-made and I eventually parted company (but not before I got the sweater back!)  For many years, it sat in a cedar closet.  Finally the time came when another person came to want to wear it. However, in its original state, it was too long and the neckline did not suit.  

The turtleneck grew right from the
sweater top--I evidently had not yet
discovered neck shaping

This garment was knit in the round, which meant there were no seams to get in the way.  Had the garment been made in pieces, the first step would have been to undo the seams, then unravel the individual pieces as needed. (BTW?  Any garments I make with seams, I always use a different color yarn--close, but not exact--to seam with, so that I can take the seams out in some future re-styling event, without snipping into the garment by accident.)


...unraveled the yarn down to the
point where the new neck edge was to begin...

The sweater was made so long ago, there was no hope of finding excess yarn in stash. The unraveled yarn therefore had to be de-kinked and re-used.  I snipped a single stitch at the edge of the neck and, as shown above, unraveled the yarn down to the point where the new neck edge was to begin. I put the loose stitches onto a knitting needle to re-knit the neck. 

Excess length being removed

At the bottom, I removed the excess length: I snipped a stitch, then unraveled in both directions, catching the stitches onto a needle.

Reworked sweater before blocking

Above, you can see the new neck and new bottom band, together with the excess length, now removed.  The neck is a perfectly standard crew neck.  The back of the garment was raised by doing three series of short rows: one stretched from front shoulder seam around the back to the other front shoulder seam; the second and third stretched from the back shoulder seam across to the other back shoulder seam.  This raised the back of the garment 6 rows (just over an inch) above the front. Combined with the bottom the neck opening being lowered, the front-to-back differential supplies the neck shaping so sadly lacking in this sweater's first life.

BOTTOM BAND DETAILS
On the bottom band, I used my trick for transition zones, modified as follows:
Round 1: (first row of dark gray): knit all the way around, shown by blue stitches/arrows in illustration below--as you can see, this extra round prevented the puckering of the ribbing from traveling into the lighter stripe above the ribbing
Round 2: slip the knits wyib (with yarn in back) and purl the purls--
Round 3: Knit the knits and purl the purls
Round 4: as round 2: the elongated knits which resulted from rounds 2 and 4 are shown by the red stitches/arrow, below  
Rounds 5-12: as round 3

close-up of the transition zone tricks
As shown by the photo below, the ribbing was finished off by knitting around rounds 13-15, which makes a rolled-over edge for the ribbing, a trick which means that the edge of the FABRIC isn't the edge of the GARMENT)

close up of rolled edge
on lower edge of bottom band

Round 16: bind off with a chain bind off, using the "OK" alternative for the last stitch from the post about circular binds off

NECK OPENING DETAILS:
To knit the neck above the bottom of the opening, I worked around-and-back, meaning that I actually worked flat, knitting there and purling back, as shown by the below schematic--the green lines show the original circular work, the blue lines/arrow show the short rows at the neck edge. At each neck edge, rather than decreasing stitches, I held all the stitches live.  In other words, in the gray front section, I did not bind off as I worked the neck, but transferred all the center-of-of-the-neck stitches onto a scrap piece of yarn, then added additional live stitches at each neck edge as I came to them via short row, rather than binding them off. 

Schematic of neck edge showing short rows (blue)
area of live stitches (front and back, gray)
as well as edges with no live stitches (red) where live 
stitches had to be picked up, prior to bind-off

In other words, if you think about it, what I was really doing at the neck edge was knitting short rows--each of those blue rows got a little shorter as more neck-edge stitches were transferred to the holder, there to join the live stitches from the previous rows. Each time I came to the neck edge from either side to drop off more stitches onto the holder, I worked a wrap-and-turn

Once all the stitches for the neck front were decreased (ie: transferred to the scrap yarn) and the neck line finished, I had the back-of-the-neck stitches live (gray on above schematic) the front-of-the-neck stitches live (gray on above schematic) and a stretch between them (red) where the fabric edge (straight part of the curve of the neck) showed, but there were no live stitches.  Along this straight red part, where there were no live stitches, and using light gray yarn, I picked up stitches through this fabric edge at what seemed to me an appropriate rate.  I then had live light gray stitches all the way around the entire neck.  

The next thing I did was to bind off all the live stitches (including the ones I had just picked up along the red areas).  I used the dark gray yarn to do the bind off. Does it seem odd to you to purposely pick up stitches, just to bind them off?  The first reason I did it was to get a decorative and uninterrupted line of chains around the neck edge.  However, there was a structural reason, also: not only did I want to reinforce the neck edge along the back of the neck to prevent slipping, but I actually wanted to go all the way around with the reinforcement: the sweater is old, the yarn somewhat fragile, the new wearer a young adult fond of pulling at the necks of every garment worn.  I hope that a continuous bind off will help prevent horrid accidents when the neck-tugging begins. (Needless to say, the bind off was done VERY loosely, otherwise, there would be a problem getting the head through the hole.)

The wraps from the wrap-and-turn stitches were lifted off the underlying stitches and knit together with them.  The only exception is that, about a quarter of the way up the curve of the neck on both sides, instead of lifting one of the wraps and knitting it together, I used this lifted wrap as if it were a free-standing stitch.  This added a little ease along the curve.  In other words, this trick added one extra stitch at the sharpest part of the curve on each neck-side, and this was done to prevent puckering. 

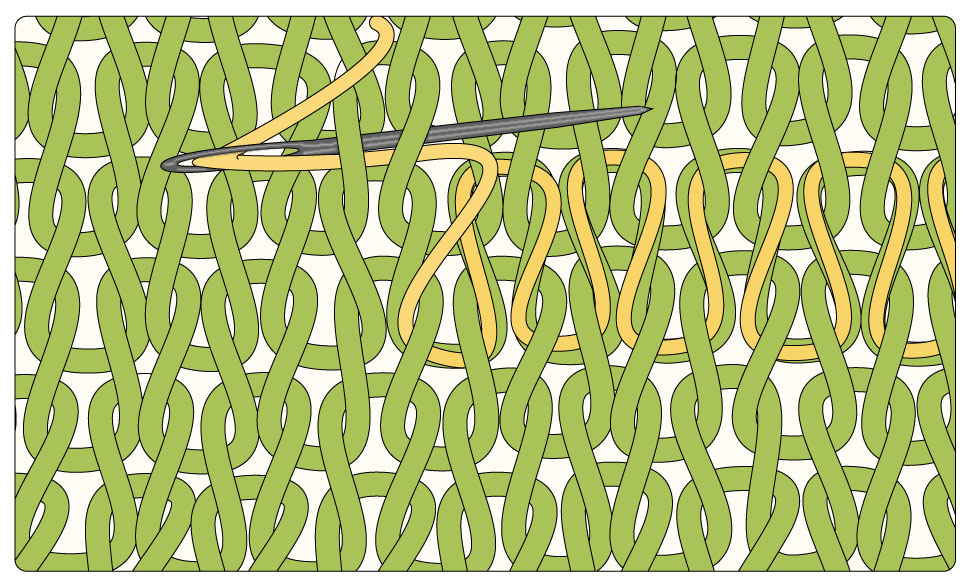
As shown below, the bind off was worked so as to leave the dark gray chains showing on the sweater surface.  These chains are shown by the bottom double-headed red arrow.  I then picked up new stitches THROUGH the bind off by holding the yarn on the outside of the garment and drawing a loop UP (towards the neck hole) through the chain bind off--one loop into each chain, with the loops drawn up in such a way as to leave the entire chain exposed on the surface.  The thin red lines show the method and direction in which the loops were pulled up: the dotted portion is the part of the loop which passes through the chain, the top part of the loop is the actual picked-up stitch, the bottom part of each loop hides between the chains of the bind off.

Close-up of neck band

Once I had live stitches all the way around, I knit a short band (4 rows high) then worked a purl round to make a nice sharp fold-edge, then three additional rounds on the inside for a facing. (In the finishing process, the live loops at the bottom of the facing are pulled down so long on the inside, that you really do need at least one fewer rounds on the inside of a facing than on the outside.  Having fewer rounds on the inside of a facing also helps prevent the facing from rolling outwards).

The live stitches of the facing were tacked (sewn) down to make a hem inside the garment, using the overcast stitch: one stitch for each live loop. If you go to try this yourself, the situation seems like an impossible mess, with the inside of the facing at least twice as wide as the fabric you are trying to tack it to.  However, as you tack each stitch down, the mess lessens.  The final result, contrary to first expectation, is quite neat and tidy, as shown below. 

Close-up, inside of neck hem (facing)--the
live stitches have been sewn down with
the overcast stitch

The grand finale of the neck edge was to take matching sock yarn and adapt my "neat little edging" in slip stitch for the ribbing around the neck, matching the chains of the edging to the direction of the chains in the chain bind off. The sock-yarn edging is shown by the top double-headed red arrow two illustrations above.  Again, this was to reinforce the neck in preparation for the inevitable neck-tugging in its future, again, this had to be done loosely

FINISHING DETAILS
The last step was to wash and block the garment. I blocked it quite a bit longer and narrower, but still substantially shorter than the original.

This red towel has been washed so often,
I knew it wouldn't bleed.  However, if in doubt,
use a white towel.

In truth, if I'd had my wits about me, I would have blocked it BEFORE I knit on the new neck and bottom bands: bands don't need to be blocked and brand-new bands are delightfully elastic.  Oh well, I'll try to remember to block before knitting the bands the next time I rework an old sweater (although there are fewer and fewer in that closet, as more of the old sweaters escape).
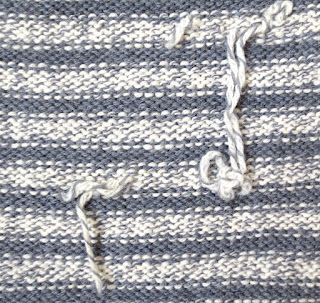
a hole
Ooo--I'm wrong again, there was one more step: like many old garments, this sweater had developed some holes, as shown to left.  Worse, it had mysteriously become stained.  The yarn was weakened over the stained area--evidently the stains ate away at the yarn.   I spent an hour or so with a dull-pointed needle and some reclaimed yarn, duplicate stitching over the holes as well as over the stains, so that the stains did not become holes as the sweater was worn.  Also, reinforcing the stained areas made it possible to give them special attention when washing, whereas if these areas were not reinforced, the special attention would have shredded the already-weakened yarn.

Once washed and blocked, the stains lessened and the duplicate stitch flattened down.
duplicate stitch over stain
As shown to the right, only in extreme close-up can you really see where the duplicate stitching was done, and only because the garment hasn't been worn much in its new re-worked state.  Over time, even that residual uneven-ness of the columns will straighten out. A tiny bit of the stain still shows, so you can tell what it looked like before the duplicate stitch--click on photo to enlarge, stain peeks out at lower center.

Below, you can see from the inside that there were actually quite a lot of spots duplicate-stitched over (and yes, I will work in all those ends before I finally sign off on this garde-tricot project, using my new favorite method, a knit-picker.)

ends left dangling from the duplicate stitch

Good (re-)knitting--TK

Pattern beta/test knitters

Dear readers: you are amazing.  Wow.  There have already been more responses than I can keep up with--so thank you very much. I'll leave this up for reference, but with the text crossed out. Hopefully, the pattern will soon be available, if the test knits work out.

Thanks again, and happy, happy new year. TK

ADDENDUM Feb 2012: The pattern has been test knit and is now available.

Lately, more patterns have been generated here at chezTECH.  The latest of these is a ladies' cap called "Spice Road."  It's a pretty neat pattern: it's knit flat in stockinette, all in one piece, utilizing a lot of short rows. Then, the fabric is folded, welted, seamed.


I named it that after the fabled spice road of old, because it has three design features found in central Asian headgear: a wide smooth expanse over the brow, a little brim which runs around the top, and a turban-like fold in the back.


One problem is making sure TECHknitting patterns are correct. Lately, I've been doing all the test knitting myself.  Yet, this is not a great idea. Because I know how the item ought to come out, I'm afraid I'd gloss over any error in the pattern.  Spice Road is, I think, ready for release, but I wonder if any my lovely TECHknitting readers out there would consider test knitting it first? The pattern is designed for intermediate knitters and above (but a bold advanced beginner could probably manage).


Here's the deal:  It would be great to have a three (or so) test knits. So, to those volunteers, I'll send the pattern as a PDF.  You buy the yarn or use up stash, and knit the cap by January 31, 2012.  Once you've gotten back to me with your comments, and once the cap is posted as a project on your Ravelry page, I will send you a $25.00 honorarium.  This will hopefully cover your yarn cost.


$25.00 for test knitting isn't a lot, and in an ideal world, it would be more, for sure.  However, in this non-ideal world, any money from the sale of the Spice Road cap pattern over and above the honoraria is instead slated to go towards snowpants, socks, boots and science club funds, all of which the local schools around here are finding in precious short supply.


Tech details:  a single 100 gram skein of worsted weight yarn will suffice. Common yarns in this weight include Cascade 220, Wool of the Andes, Northampton Valley Yarn, Pattons Classic wool, and the like.  The cap would best be made in wool--synthetics, especially "soft" synthetics,  may not have the body required for the details of this cap to work out. The gauge is 5 st/in, 7 rows/in, pretty standard for this weight of yarn. A circular needle 22" or longer is required for knitting stockinette back and forth at the required gauge (there are possibly too many sts on the needle at one time for a single-pointed needle to work). A 16" circular needle a size smaller is also required, as is a crochet hook of size proportional to the yarn. A steam iron will be handy for blocking.


Bottom line: if you are an intermediate knitter or above, if you are interested in being a test knitter for Spice Road ladies' cap, and if you can can afford to do so under these terms, write to me at the e-mail address under "profile," at the top of the right side bar. We'll work out the details to our mutual satisfaction, and then I'll send you the PDF pattern. And for everyone else, if the test knits work out, the pattern for the Spice Road cap will be for sale: this winter, hopefully.


Thanks for your consideration,
Best, TK

All Caught Up


Well...not quite...but at least most of the Christmas celebrating is over and I've even caught up on my sleep.

One More To Go
Each New Years Eve, we celebrate Christmas with our friend Charles. It entails an early dinner at a nice restaurant and exchanging gifts. This will require that I wrap the completed Henry scarf before tomorrow sometime.

This year, I wasn't feeling overly joyous as the holidays approached, and I didn't send out many cards or gifts. I'm feeling quite a bit better now, so I figure I could send out personal notes to the folks that were thoughtful enough to send their greetings. Most years, the cards and/or obligatory gifts seem so impersonal to me, but this year, many of the folks that sent me cards or gave gifts were quite personal and thoughtful.

Current Knitting
Finally finished the bind-off on the Henry scarf, and the scarf is ready for gifting. I don't know that I'd really recommend this scarf. The result is a lovely scarf, and using the Malabrigo, it's luxuriously soft. However, I'm not sure the effort is worth the result. Here are some final pictures.


If folks do decide to make this scarf, I would HIGHLY recommend using someone else's description of the tubular bind-off. I wasn't able to decipher the one published in the Knitty pattern, and I know what I did isn't a tubular bind-off, although it looks fine. I wish I had used the TechKnitter's version of the tubular bind off, which makes much more sense to me.

Daily Mug Shot
I saw the Daily Mug Shot widget on Sean's blog, and decided I must have it. If I'm able to keep updating it, I'll keep it...otherwise, it'll be toast.

- It never occurred to me that quickly changing photo montages, like my Daily Mug might have an effect on folks with epilepsy. I've decided to keep updating the Daily Mug shot, but to remove the widget from my left frame. Thanks to those that mentioned this.

Readers' Comments/Questions
About the new comments functionality, AliceQ writes, "PS Disqus doesn't like the URL for my Livejournal knitting posts."

I looked at my settings to see if there was any changes I could make that might affect this, and there didn't seem to be any. I also looked in the help functionality and there was nothing about this. If folks have other issues like this that become annoying, let me know and I'll got back to the old commenting through Blogger.

Knitchick Paris writes, "I have a question that has been on my mind.... your retirement calendar caught my eye. Do you hate your job? Just a question!"

Not at all...I actually quite like what I do. I may even continue to do some freelance work after I formally retire as long as the opportunity looks good. Retirement means not having to work in my mind.

Monday, December 28, 2015

The English knit stitch

The English knit stitch differs from the continental knit stitch in only one detail--which hand supplies the yarn. In continental style knitting, the LEFT hand supplies the yarn, in English style knitting, the RIGHT hand supplies the yarn. The yarn, however, goes the same way around the needles, and the needles go the same way through the loop.

If you are having trouble wrapping the yarn correctly in English-style knitting, look at the three yarn wrapping errors illustrated for continental knitting (ignore the fingers, just look at the way the yarn lays on the needles) link 1, link 2, link 3. Each of those yarn-wrapping errors is a wrapping error in English-style knitting also.

THE ENGLISH KNIT STITCH
click picture

Step 1: The right needle is inserted FROM the FRONT, TO the BACK of the stitch at the tip of the left needle, as shown. The right hand supplies the yarn--the right forefinger carrying the yarn acts as a shuttle, tracing a path in the air shown by the dotted line, above. The standing yarn (green) takes the path shown by the solid red arrow, wrapping around the RIGHT needle.

click picture

Step 2: Once the standing yarn (green) is wrapped around the right needle, the tip of the right needle draws the wrap "down and through" the stitch at the tip of the left needle as shown by the red arrow.

click picture

If everything goes right, this is what you will see on your right needle--a new stitch (green) with the right arm forward.

Other posts in this series:
The continental knit stitch
The continental purl stitch
The English purl stitch

--TECHknitter

(You have been reading TECHknitting on: The English knit stitch.)
IT'S VOTING TIME!!!!

Yes, I've tallied all of the nominations, and programmed a voting page. Congratulations to all those nominated, and good luck to those in the running.

Knit Blog Award Voting Rules
I must start by saying that my programming and HTML skills suck, so hopefully, this voting will go smoothly.

I have been able to limit folks capability for multiple voting, but not eliminate it entirely, so this year's awards may not be the most democratic of Knit Blog Award history. I would ask that you only vote once per day at the most between now and the end of voting.

I also haven't been able to disallow voters from seeing the results of the voting when they submit their votes. I would have preferred letting that be a surprise, but alas, I can't with my limited abilities.

Finally, voting might be a little cumbersome, since you will need to return back to the voting page for each category you decide to vote for and click on the "Submit Vote" button for each category. Not overly user friendly, but it's the best I could do.

Voting will continue until midnight on Friday, January 6th, 2006 (Eastern U.S. time).

Shortly thereafter, winners will be announced and posted to the Knit Blog Awards official website.

Let the voting begin.

Knit Blog Awards Voting

Hopefully, at the least, this will expose folks to a lot of new knitting blogs

Knitting Ambivalence


I'm jumping between a lot of new projects that I'm not thrilled with and avoiding some current works in project at the same time.

Unsure What To Do Next
I'm not sure I want to start another sweater at the moment, but small projects are feeling very satisfying either.

I started a pair of socks using Carol's gorgeous yarn.


Then I decided to use up some scraps of Cascade 220 to make a Tychus Hat from Knitty.


Finally, I started a pair of mittens using the David and Mel Alpaca Herd yarn.


I can't bring myself to pick up the crochet tablecloth and figure out where I made yet another mistake and extract it from the fabric.

I should really finish the cable sweater I started a while ago.

Maybe I'll just focus on the kid alpaca bedspread/coffin cover until I figure out what I want to really knit when I grow up.

New Books
Part of the order from Amazon were three new books I ordered for myself.


Knitting For Him by Storey is a beautifully edited book with lovely models. Most of the sweaters and scarfs aren't items I'd make. Many of them are either impractical (such as scarfs you can only show one side of) or require a certain style to be able to get away with wearing them, or are just plain boring.

I love the Kaffe Knits Again book. It brings back tons of Kaffe's best designs in current Rowan yarns. Like they were in the past, however, they are for very slender men, unless you modify the pattern to make them for someone more my size. He also includes a few one-side scarves in intarsia. What does the other side look like?

Finally, I also got Kaffe's latest quilting book, Kaffe's Quilts in the Sun. I know it's not knitting, but it is truly spectacular. Liza has a quilt in the book called Perkiomen Valley that is breathtakingly beautiful There are 20 designs in this book and all of them are amazing to look at.

A New Zealand Flavored Christmas
Finally, big thanks to Kiwi friend James for his wonderful knit-bag full of gifts (yes, I did wait until Christmas to open it this year).


New Zealand pencils and a pen, a sheep pencil sharpener, a beautiful bookmark, the ever-useful New Zealand 2008 picture calendar, and of course, the huge bar of Kiwi Fruit Chocolate. There is some water-expandible object I haven't figured out what it is yet.

Many thanks.

Readers' Comments/Questions
About the Alpaca Herd Jacket, Seanna Lea asks, "Will it be too warm to wear on a regular basis?"

I wore it to my mom's house at Christmas, and it was to warm, and yet I wore it all day in my house yesterday, and it was fine. It will definitely be handy to have around for use when I need it.

Adam Spector Hodgkins Memorial Fund