Tuesday, March 31, 2015

Festering Sores

It's interesting how life reflects the seasonal knitting magazines.

Family Circle Easy Knitting
I wasn't going to buy it, but I saw it on the stands and just had to. I admit, I have a problem.


The sad part about it, is that it's not awful, or disgusting or ridiculous (examples of all of them could be located in the magazine, but overall, it wasn't any of them).

It was just downright boring.

I was going to review the magazine in detail like I usually do, but this one reminded me so much of those little old craft magazines (Craft Basket?, Yarn Basket...what the hell was that piece of crap called?)

Anyway, the only thing of note was a new Mari Lynn Patrick design that would make your skin crawl.

Knitting
No updates here.

Now that I'm back to work, I'm trying to get enough sleep, continue the hot compresses and dress my wound myself using a handheld mirror. It takes a surpising large chunk of my time and my knitting has suffered.

Male Knitters
Liza's snarky comment in response to Maggie's comment about how great it is that men knit brings up the subject of men who knit again.

I've said this before, but it bears repeating.

It is surprising that some women will bestow upon men some magical quality, some special attributes or an aura of talent just because they do something that many woman have been doing for a far longer period of time (and are usually much better at).

It used to happen to guys on the KnitList often because many of the low-self-esteem, need-to-get-a-life-of-their-own, women would gush over any guys who posted.

I consider it a sign of self-loathing (or minimally poor self esteem) when someone assigns magical qualities to someone or something ordinary just because they perceive the person or thing to be different than them in some irrelevant way.

Readers' Comments/Questions
Marilyn asks how many yards will the Communion Shawl take?

With fringe it will take a little under 900 yards of this Sirdar stuff I'm using. I plan on selling the design using the soon-to-be Knitting Vault web site.

Finally, the ever-hysterical Liza sent me this timely and relevant link featuring one of my favority essayists, David Sedaris.

Nico Turns Two


March 31st is our good buddy's birthday, and today he turns two.


Our Joy
I love this picture of him because he's sitting next to knitting and a mushroom. Both Thaddeus and I are represented with him.

This little guy has brought a lot of enjoyment to us. Just this morning, he woke up at 4:30 AM to get his birthday petting before I headed off to work for the week. Upon arriving at work, I called home to find out he was getting his birthday breakfast snack of cream cheese...licked directly off Thaddeus' finger.

It just goes to show that with love and attention (which he gets a lot of), even former street urchins like Nico can learn to be sweet and delightful.

Current Knitting
This week way too busy with tax preparation and setting up my new home office space. I did get up to round 99 on the Ichida lace. I'll post a picture later this week.

To give you a little progress map on where I am in the design, here's the graphic from the book, and the dark square shows approximately where I am (with 41 more rounds to go).


Readers' Comments/Questions
Long-lost Barb B. reappears to note, "I see the tea cloth is done, so I better make plans for Rhinebeck and high tea. Do I need to bring the Kraft peanut butter?"

No need...I get about a case of large jars shipped to me now about once a year, and that should hold us.

She then goes on to ask, "I am really admiring your lace spinning. What do you have in mind to knit from it, or has your thinking gone that far?

I will look through the Ichida books and also at some on-line resources for Niebling lace and find something large and appropriate for the finished yarn.

Also about the spinning, Tallguy asks, "Are we vying for the finest thread or what?"

I am actually spinning this as thin as I can, so the single is always right on the verge of breaking...or actually breaking. It adds a bit of time to the process to re-attach to the roving and resume spinning.

Monday, March 30, 2015

TECHpattern and tutorial: gaugeless MAGIC LOOP ski hat with a TKIO (Part 3 of the "knitting seamless tubes and circles" series)

This post is PART 3 of the knitting seamless tubes and circles series. It is also (ta da!) the first TECHpattern--a pattern and tutorial for a ...

Gaugeless, guaranteed-to-fit
MAGIC LOOP SKI HAT with a TKIO
2 magic loop ski hats
This is a very long post. Every detail I could think of is covered in excruciating detail for those who might otherwise be alarmed by the prospect of knitting a seamless tube. However, this is actually a very simple "envelope-style" ski hat, knit from the top down with a too-long circular needle in the "Magic loop" technique.

This hat doubles as a tutorial on the Magic loop method. But it also doubles as a gauge swatch, because you can make this hat using ANY weight of yarn with any needles proportionate to that yarn. (If you want to learn Magic loop, or if you want to make a gauge swatch for some yarn you're thinking of using for big project, your effort won't be wasted even if you don't want a hat of this style for your own personal collection. Four oz. of yarn in any thickness pretty much makes a hat, and lots of worthy organizations collect hand knit hats for shivering little kids all over the world.)

Materials
  • Enough yarn in any weight to make a hat (4 ounces of most weights of yarn will do it) and
  • A too-long circular needle in any size you want to try, in a length of 40 or 47 inches. The needle must have a VERY flexible cable.
  • A second too-long circular needle OR a 16" circular needle, 2-3 sizes smaller than the first, to be used for the ribbing.
Addi Turbos are usually too shiny for me, but they unquestionably have a very pleasant, flexible cable, well-attached, which easily stands up to the cable-torture the Magic loop technique metes out.

I think of ski hats as being knit tighter than ordinary hats, and the two sample hats of the illustrations were each knit tighter (that is: with smaller needles) than is usual for that type of yarn. You can make up your own mind about this. Because it is gaugeless, you can mess around on this hat matching needles to yarn, to see what happens to stitch gauge and row gauge.

Link-o-dex
If you need more info than the pattern contains, some of the methods used in this hat have been described elsewhere in this blog. Most of these links are also inserted in the part of the pattern where you'd maybe need them, but they're also collected here in one handy spot.
click picture
•The hat is started from a little I-cord loop, called a TKIO (see "The TKIO--a cute way to start hats" TECHknitting of March 6, 2007.)

•Next, the stitches are placed on a circular needle, separated into a front set and a back set in preparation for knitting the hat with the magic loop technique. (see "Knitting seamless tubes and circles, part 2--the theory" TECHknitting of March 16, 2007.)

•The hat grows wider through matching sets of right- and left-leaning increases (see "Two handy increases, one slanting left, one slanting right" TECHknitting of March 20, 2007.)


•Deciding how large to make the hat requires taking "ease" into account. (see "Gauge, ease and fashion or--'why doesn't my sweater fit?' " TECHknitting of January 23, 2007.)

•The hat is ended with a ribbing--the last round of the hat and the first round of the ribbing are knit with a special trick which improves the ribbing transition zone (see "Where the ribbing ends--improving the transition zone" TECHknitting of March 9, 2007.)

•Finally, there's a neat trick for binding off the ribbing (see: Easy fake tubular bind off: casting off 1/1 ribbing the TECHknitting way, TECHknitting of April 1, 2007)


THE PATTERN


Part 1: starting the hat from a TKIO
STEPS 1-4 are only done once for each hat--to get the hat started from the TKIO.

step 1: (below) Make a TKIO as set forth in the TKIO post. However, do not transfer the stitches to double pointed needles.
click picture
step 2: (above) Transfer the TKIO to circular needles as shown. The ball yarn is coming out to the left, the needle tips are facing left, and you are looking at the "outside" of the TKIO.

TECHtip: All kinds of side-to-side AND top-to-bottom rotation is going to happen next. To better track which needle is which, maybe get a SHARPIE and mark your top needle--the one that's red in the illustrations. Having a mark makes it much easier to follow the action--the marked needle will always be your working (right) needle.

step 3: (below) To get this configuration, the TKIO has been flipped side-over-side so the ball end now comes out to the right, the needles point right, and you are looking at the "inside" of the TKIO.
click picture
step 4: (above) The red needle has been drawn all the way through the top three stitches. Those stitches are now resting on the cable, and the red needle has been brought all the way around to the working position. Fold the TKIO in half so the inside is in and the outside is out--the TKIO should hang DOWN from your needles, not stick up (see step 5 for a picture of this). Using the red (working) needle, knit the three stitches on the green needle. This knits one side of the TKIO shut. (For further info on splitting the stitches into sets, try this link.) You are now about to start knitting on the hat, proper.

TECHtip: Give the yarn a good yank before you knit the first stitch of any set. See--on a circular needle, the cable is a much smaller diameter than the needle tip. By giving the yarn a good yank before you start knitting with the red (working) needle, you're removing the normal slack between the stitches AND considerably tightening up the loop of the previous stitch, that being the last stitch on the cable.

By making the last few stitches on the back needle smaller, and removing the normal slack between the stitches of the back set and the first stitch of the front set, you will get a nice, crisp edge--a built-in fold line. In fact, because of this tightening trick you'll get a MUCH nicer, crisper edge between the stitch sets with Magic loop than would be possible with double pointed needles (dpn's have no small diameter cable to tighten edge stitches around). In a previous post, I said that I find Magic loop best suited to items which will be used folded over as they are knit, such as the ski hat we're making here. This fold-line trick is the reason.

BTW: the opposite is true also. If you want to knit truly round objects--such as socks--with the Magic loop technique, you have to be careful NOT to give that edge stitch a yank, or you will get a "fold line" down the middle of your sock, where you might not want one!


Part 2: Knitting the top (slanted increase portion) of the hat

STEPS 5-8, described below, are the Magic loop technique, repeated throughout the rest of the hat. Each round is made of two half rounds
  • Steps 5-8, when repeated ONCE make a half round.
Each full round is made of two half rounds.
  • You must repeat steps 5-8 TWICE to make each full round
This hat is knitted by alternating one full round "plain" and one full round with increases. On every plain round, no increases occur--you simply knit into every stitch on your needles, including knitting into the increase stitches which were added in the row below. On every increase round, you add four stitches. By locating these four stitches near each end of each stitch set, you get the classic "envelope" ski hat shape.

Knitting one round plain

In starting the hat from the TKIO, you have actually already knit 1/2 a round plain--all that remains in the first round of plain knitting is to create another 1/2 round.

step 5: (below) The front three stitches have been knit with the red (working) needle, and the green needle is popped loose of the work.
click picture
step 6: (above)To get to this configuration from step 5, draw the green needle (the needle now loose) rightwards, so the back stitches which were on the cable, will be resting on the green needle instead, as illustrated.

step 7: (below) To get to this configuration from step 6, the work has been flipped side over side, such that the red (working) needle (carrying the stitches just knitted) is in the back, and the green needle is in the front.
click picture
step 8: (above) To get to this configuration from step 7, the red (working) needle has been drawn out of the back stitches such that these back stitches rest on the cable of the circular needle. The red (working) needle has been drawn to the front, and is ready to knit the front stitches off the green needle. To complete the second half of the round, use the red (working) needle to knit the front 3 stitches off the green needle, until you are back in the same configuration as shown in step 5.

Steps 5-8 are the steps you will follow to make every 1/2 of every plain (no increase) round. In other words, to make a whole plain round, you would repeat steps 5-8 twice--once on the front set of stitches, and once on the back set of stitches.

TECHtip: The gymnastics of rearranging the needles between sets means Magic loop knitting is not a good candidate for marking the beginning of the round with a stitch marker. Instead, put a safety pin in the fabric at the edge where each round starts so you can tell in which half of the round you are working. (The picture of "measuring a hat for length," below, shows a stitch holder being used as a round marker.)

Knitting the increase rounds

The increase rounds are superimposed on the pattern of Magic loop knitting set forth in steps 5-8, above. On an increase round, the increases are made one stitch from the edge on each stitch set. (For further info on increases, try this link ) Specifically, on an increase round, during step 8, make the first half of the increase round as follows:
•* K1 (knit 1).
•Make a right leaning increase by the forwards loop method
click picture

•Knit to within 1 stitch of the end of the stitch set (on the first time you do this, you'll only have to knit 1 stitch before you are within 1 stitch of the end of the stitch set).
•Make a left leaning increase by the backwards loop method.
click picture
•Finish this half of the round by knitting the last stitch on the front needle (K1).*
What you have just done is to perform increases on both ends of the first half of the round--in other words, on both ends of the first repetition of step 8 of the Magic loop knitting sequence. You will now have 5 stitches on your front needle instead of the three you started with, and you'll need to re-arrange your needles as per steps 5 -7 to get to the second half of the increase round. As you knit the second half of the increase round, when you get to step 8 again, you'll repeat the sequence within the asterisks: *k1, make a right leaning increase, work to within 1 stitch of the end of the stitch set, make a left leaning increase, k1.*

From here on out, you follow the Magic loop sequence of steps 5-8 for each half round. The hat is created in 2-round cycles: On alternate full rounds, you knit plain on both sets of stitches (no increases) and on the following full round you create increases during step 8 on both halves of the round (both sets of stitches).

Deciding when to stop increasing

click picturemsurng for stitch gauge
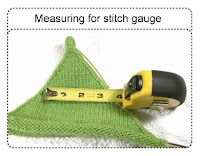
In knitting the hat from the top down, you quickly create enough fabric to measure. And measure it you should. Begin by steam blocking--once you've made enough fabric so you can keep your iron away from the needles (and especially, away from the plastic cable) lay the work (still on the needles) on the ironing board. Set the iron on steam, hold the iron an inch or so above the fabric, and let the steam penetrate the fabric. Pat the fabric flat, let it dry (takes only a very few minutes). Lay a tape measure on the hat. Now you've got your stitch gauge--the number of stitches to each inch of fabric.

You might think the next step would be to measure your Intended Wearer's (IW's) head and keep increasing to match that measurement, but there is a better way. You see---measuring your IW's head does not tell you anything about how your IW likes hats to fit--whether tight or loose. In other words, a head measurement tells you your IW's head size, but says nothing about how much "ease" they prefer in a hat. Instead, take your Intended Wearer's favorite hat, and measure how big around THAT is. Do the math and figure out how many final stitches you must have to make the hat you're knitting match the favorite hat. As an example, if the IW's favorite hat is 21 inches around, and if you are getting 5 stitches per inch, your final stitch count ought to be 21 x 5, or 105 stitches.

TECHtip: Gauge is notoriously hard to nail down, partly because it's so hard to measure. It's very common to mistake 5-1/4 stitches per inch for 5 stitches per inch, or 4-3/4 stitches per inch for 5 st/in. Result? Garments too big or too small. Stack the odds in your favor: measure over 3 or 4 inches or even more. Measuring over this longer span makes it less likely that you're holding the material under tension when you measure, and it also makes it easier to account for fractional stitches. It is because bigger gauge swatches are much better than smaller ones, that gaugeless hats are such a great way to test-drive your yarn while also creating a reliable gauge swatch.

You might think it wise to test the hat's diameter by having the IW try on the hat-in progress. But beware: a try-on can be misleading because stitch gauge has the most ferocious tendency to stretch on a piece of knitting which is not bound off. If the trial try-on and the mathematical option disagree, let the math rule. As long as you've carefully measured your gauge AND the target hat, then--as counter-intuitive as it may seem--the math is far more likely to be right than the try-on as regards the diameter of the hat.

Part 3: Knitting the hat to the correct length

click picture2 folded hats
Once you've got the hat as big around as you need it, stop increasing and simply knit the rest of the hat plain until it is as long as you need the hat to be. Unlike the diameter of the hat, however, the length is a little trickier to measure off an already existing hat. As you can see from the picture, these two hats, knit to the same pattern but out of different yarns have vastly different relative row gauges--they have different angles and rates of increase. The first time through with a new yarn, you really don't know if the ski hat you're knitting might wind up with a relatively flat-ish top, or almost pointy enough to be an elf-hat.
click picturetry hat 4 lngth

This means that even if the ski hat is pretty much the same style as the IW's favorite hat, unless both hats have the same relative row gauge (angle of slope), you really can't measure the correct length from an existing hat because you can't know how deeply into the point your IW's head will go. This is where it IS handy to have the IW try on the hat-in-progress: unlike stitch gauge --which stretches madly on unbound knitting--the row gauge on the hat-in-progress won't stretch. Therefore, you may confidently rely on the try-on to determine the length.

Magic loop and the plain tube

As you knit the plain tube, there is no reason to keep the two circular needle cable loops popped loose of the fabric between the stitch sets as you've been doing up to now. In fact, there are good reasons why you shouldn't keep the cable loops popped out in the same place. If you keep the stitch sets separated past the increase rounds, you may wind up with the fold line carrying down the body of the hat, where no fold line is necessary.

To avoid this problem, you can either switch to a shorter (16") circular needle in the same size as the one you have been using, OR you can switch to a more free-form version of Magic loop knitting which has only one loop of cable popped free. To do this, you simply dig out one loop of cable from between two random stitches, about 3/4 of the round away from where your needle tips are. When you've knit to that spot, you reposition the cable another 3/4 of a round away from where the needle tips are, and so on . By randomly varying the place where the cable pops loose of the fabric, you avoid the fold line problem, and you also avoid any tendency towards ladders which might otherwise trouble you.

In any event, however you choose to do it, at some point, you will have knit the plain tube of the hat 1-2 inches less than the final desired length.

Ribbing

The last 1-2 inches of the hat are knit in ribbing. If you have a sort of ribbing you prefer, and if you have neat way to bind it off, use that. Otherwise, switch to a 1/1 ribbing (k1, p1) and prepare for the ribbing transition zone as follows: Switch to needles 2-3 sizes smaller, and knit the last full round of the hat. On the next round, establish the 1/1 ribbing by slipping the knit stitches, and purling the purl stitches. On every round after that, create the ribbing by knitting or purling as the pattern is set. When the ribbing is long enough, bind off. That's it--you have a gaugeless, guaranteed-to-fit, Magic loop ski hat, started with a TKIO.

--TECHknitter
(You have been reading TECHknitting on "TECHpattern and tutorial: gaugeless MAGIC LOOP ski hat with a TKIO (Part 3 of the "knitting seamless tubes and circles" series)"

Questioning Myself


Some folks question themselves because they're uncertain or have low self-esteem. I question myself and my motives often, because I think it shows an interest in self-improvement.

Accepting Feedback
With the recent comments from Anonymous, I've had a few responses that I'd like to share with y'all.

When the first brief comment about my colour sense came through, I thought I had pissed someone off again, and this was their childish way of trying to insult me. The comment provided no actual feedback, it just really stated an opinion, albeit stated as fact. I know my sense of color isn't for everyone, and I'm glad for that.

Then, when the more detailed description of why my color sense was strange came in, my immediate reaction was one of annoyance, and defensiveness. After getting past my initial emotional response, I thought through what the commenter was saying. I still think the comments are childish, but in a different way now. For someone to have absolute opinions about something as subjective as color sense (rules such as a piece must have harmonious colors, or a color theme to pull colors together), and then try to impose those rules on others, seems sophomoric to me. Kind of like the absolute, black & white opinions of an adolescent.

And with the final sentence of the comment, dictating that I "need to look at colour theory," seemed to indicate that the commenter was either trying to get back at me for something I've written in the past, or is one of those people that thinks there is only one true religion, or one right way to knit, and would tell someone they must accept Jeseus or take a proper knitting class.

Just to be clear, I reject the color sense of the commenter completely. I purposefully steer clear of conventional (boring) color combinations that I could purchase in Brooks Brothers. And even if I created a multi-color garment that didn't end up working out to be what I would consider appealing, I always feel I've learned from the exercise. To be even clearer, I don't think the commenter should change her/his opinions on colour theory if that's what makes the person comfortable.

Current Knitting
I have finished the fourth pair of felted clogs, and I'll probably knit one more pair before felting the whole lot at once.


I am working on finishing up a very finicky collar on the dark tweed pullover, and as soon as I'm finished with that, I'll start the fifth pair of clogs.

Yarn Remnants


Is this my latest purchase from my favorite yarn store, Twist?

No. I have a friend who has a friend who knits cuffs on the ends of plain knitted gloves and sells the result. My friend asked if I had any remnants of wool yarn that she could give to her friend to help build a stash of yarns for her. Since my Hefty Bag of remnants was overflowing, I was only too glad to get rid of this bag full of yarn.

Readers' Comments/Questions
In addition to hating Hillary, Leslie writes, "Colorblock sweater looks really nice - both sides. Isn't it a pain keeping all the bobbins straight?"

No, not really. The butterfly bobbins help with that a lot. They keep the yarn ends short and tangle-free, but let out the yarn loosely enough to let me knit smoothly and quickly.

Miss T writes, "Your colorblock cardigan looks wonderful! Are you weaving in the ends as you go?"

Yes, I always weave in ends while I knit if I can. If I had to go back with a darning needle with all these ends, the sweater would never get done. I've gotten very accurate at breaking off the yarn at the end of a square to the exact length it takes to weave it into the following block.

Dawn writes my favorite comment in a long time, with, "When I see such vehement opinions like Leslie's and Carol's I can't help thinking that something else is going on. Have their opinions been affected by some smear/propaganda campaign. I juat can't imagine anyone talking about GWBush like that, and he deserves it. Their language seemed out of proportion for talking about a political candidate. Any ideas?"

That is a fascinating idea. I personally like Hilary, and I would love to see her in the White House as the first female president in this country (it's about time). Although, I think the rhetoric on this blog about dubbya can be equally as vitriolic, I also think he's much more deserving than Hillary. So, I guess I do have to believe that some folks' response to Hillary is due to the constant anti-Hillary bashing she went through during Bill's presidency and the NY senate elections. I must admit, I get weary of her vascillating sometimes, but I still think she's a brilliant politician who would be an incredible president.

Great Movie


If his latest movie, "Two Lovers" really is Joaquin Phoenix's last movie, he will end his film career on a very high note.

Two Thumbs Up
Thaddeus and I had the chance to go see Two Lovers this past weekend and we were both extremely enamored with the movie...specifically Joaquin Phoenix's acting. I've honestly never seen someone convey a sense of such intimacy and closeness on a movie screen before.

I don't normally recommend movies, because obviously people's tastes vary considerably...so I won't recommend this one either. However, if you've seen my list of 100 top movies (in order of how much I like them...1st is the best...etc.), and you think we might have similar taste in movies, you should definitely go see Two Lovers

Current Knitting
I continued to push along on Le Soir d'Or and made my way up to Round 136.


I thought I'd do a couple of closeups of the lace to give you a Joaquin-like intimacy with it. The first one is the big flower motif.


And the second one is the some of the leaves...I left my finger in the picture to give it some sense of scale.


Readers' Comments/Questions
Thanks everyone for you comments and thoughts on the Kindle. It definitely helped me to decide that it was a good thing to own.

Dana asks, "Which Ichida book is the lace from? I have a friend that loves it, so I'd like to get the book and knit it for him. He wants a shawl for his sister."

It's the second one...the white one by Naoko Ichida called "Knitted Lace Designs Of The Modern Mode, Bk 2, Naoko Ichida"...Lacis has it on their crappy web site here. You will definitely have to use a thicker yarn and needle to get this to shawl-size.

Kelly writes, "One question: what are the Neibling pieces used for? Are they strictly display pieces or used as decorative tablecloths or throws?"

For me they are only decorative...so far. I'm thinking about doing one of these designs in a yarn and needle size large enough to make a shawl, but we'll see.

Saturday, March 28, 2015

What's The Opposite of Fanatic

Most readers know that I am not a fan of sports, and that distaste extends to pseudo sports as well, like NASCAR.

What Kind of Lesson is This?
Whenever I'm stationed in a largely blue-collar area, and I've never stayed in a place as largely blue-collar as Schenectady, I always notice certain similarities.

- Folks aspire to work in an office, even if the work is menial or clerical
- Bars and churches are the most prevalent buildings in town
- The local gay bar is in the slummiest, scariest neighborhood
- Bowling is a respectable thing to do and can't be mocked
- Trucks and cars are adorned with NASCAR stickers

This poster adorns the local Sunoco gas station where I fill up.


Is the statement here, "Fill up with gas and Budweiser before driving very fast."?

I get the impression that the man in this photo is easily recognizable by most of the folks that know anything about NASCAR, and that his presence in a national ad campaign for Sunoco seems to indicate he might have some influence over our driving youth. It amazes me that folks can protest teaching family planning in schools, yet they glorify famous race car drivers holding an open beer can.

Current Knitting
I have knit a total of one whole row on the new lace shawl, and what's even more pathetic, it was a simple knit row of only 270 stitches.

Unfortunately, based on my schedule, tonight doesn't look much more promising as far as my time for knitting goes, but you never know.

Readers' Comments/Questions
Regarding lazy kates, Judy says, "Consider buying a schacht lazy kate-they're not that expensive, and are tensioned, giving more control while plying."

I think Schacht did a great thing with their lazy kate, allowing you to ply or wind off your bobbins without worrying about the dreaded "spin back." This is especially useful for someone like me who doesn't switch flyer hooks often enough sometimes, and lets the singles build up on the bobbin, so the spinning off of the singles goes from very fast bobbin turning to not-so-fast bobbin turning and will often wind back on itself, and break my singles.

Unfortunately, the Schacht lazy kate can only handle other brand bobbins up to 8 1/8" long, and I'm willing to bet the Robin Wheel bobbins are longer than that. I'll have to measure.
Body Decay

Who'd have believed it would happen to me?

Being Sick Sucks
My knitting and my blogging have both suffered due to a couple of recent health "events".

The first was just a bad cold or perhaps the flu. Nothing that would normally stop me, although the extra sleep that was necessary slowed down my knitting.

But then I started growing something at the base of my skull that turned into a mini-nightmare. I won't go into it detail, as it's disgusting and awful, but I will say that this "cyst" was already incredibly painful by the time I went to the doctor on Friday. I wish his care had remained at the level of prescribing an antibiotic. Unfortunately, he insisted on trying to lance this sucker. The pain was more than traumatic. Ask Thaddeus...he had to deal with the quivering mess that I was after the evil doctor was unsuccessful in his efforts at making it feel "much better".

I'm still recovering.

Knitting
The cyst gave me such a sore neck (even before the doctor visit), that looking down at knitting in my lap was not very pleasant.

However, I have still been able to work on my two primary projects.


I'm up to 27 inches (with 21 more to go). Believe it or not, this project goes pretty quickly. I'm hoping to get it done relatively soon.

And then I also worked on this.


This sweater takes an awful picture. I either take it with a flash and get no detail in the sweater at all, or I take it without the flash, and the color is completely off.

You can see I've finished the bottom of the sweater up to the sleeves, and I'm almost done on the back of the sweater.

Other Blogs
As much as my friends and I rag on other knitting blogs, there are some new ones that are worth checking out as well.

For those of you who are observant, you'll notice that I added two new links in my blog link section. Check them out and let them know what you think.

Readers' Comments/Questions
Barb B. asks what to do with that hard section at the bottom of the zipper when sewing in by hand.

I actually had to use a stiffer pin (similar to Marcia's solution) to put a few holes in that section of the zipper so I could use those "pre-drilled" holes to sew into when I got to that section.

On the same topic, I was very happy to read Franklin's grandmother thought I did some fine "finger sewing". You know when someone like that says it's good, it's either incredibly good, or she's senile. Either way I was more than happy to read Franklin's comments.

Also on the same topic, I loved Donna's tip on adding in a zipper. It sounds like it would work very well.
Male Obstinance

Sometimes I ask myself whether I'd rather get what I want, or be right.

Harrowing Escape From My Own Stupidity
I was stopped for speeding last night in Latham, New York.

I was following two cars on the "Northway" (going South) who were going about 75 mph in a 55 mph zone. The guy directly in front of me and I both spotted a police car on the side of the highway at the same time and slowed down quickly. The policeman stopped me.

When he came to my car, he told me he clocked me going 91 mph. I told him I was absolutely not going that fast and that he either clocked someone else, or his radar was broken. His follow-up comments gave me the impression that he might have exaggerated my speed since I was from out of state, and not likely to contest the ticket. As part of my apology of stupidly speeding, I let him know that I was up in the Albany area every week.

He took my license and registration back to his car and returned to my window about five minutes later without a ticket.

When he emphatically repeated that I was going 91, but he was feeling generous and wouldn't give me a ticket, I seriously considered arguing the point about my speed.

Then sanity returned, and I thanked him with as much sincerity as I could muster.

But the whole situation left me highly pissed off, and unsatisfied.

Current Knitting
I'm floundering right now as to what to knit. The yarn I want to make my next sweater out of isn't completely spun/plied yet (as you'll read below), and I don't want to make more scarves or hats or small projects.

I decided to pull out the original lace project that I tried starting a while ago, and last night and this morning, I picked up around 240 stitches from the waste yarn, and unraveled the six rows of lace knitting I screwed up before throwing the whole project in a bag.

It might be too complex to start at the moment, but I didn't feel like working on anything else.

Non-Knitting Activities
I focused a lot of my time this weekend on spinning and got a great deal done.


I'm almost done filling all three bobbins. Since I was trying to determine how I would set up the three bobbins for triple plying, I wanted to check to see if I could modify my shoebox lazy kate to hold three bobbins.

While the length would hold three bobbins (just barely), the width isn't enough to handle the bobbins from my Robin wheel. They are significantly longer than my Louet bobbins, so I'll have to create a new lazy kate.

I've also been focusing some of my time on my latest book, which I just finished.


Dharma Punx by Noah Levine is a memoir of his life going from a teenager involved in punk music that takes him into a drug addiction and juvenile detention centers, to a self-actualized meditation instructor.

I found the writing to be simplistic and the editing wasn't very crisp. Many of the morals he draws from his travels I found to be mundane for someone who has clearly gone from hopeless to enlightened in the course of a memoir. However, I thought the story made up for the writing, the editing and the moralizing. I found the story real and compelling and intimate, and I also found myself relating to the author despite very dissimilar backgrounds and histories. I was glad to have read this little gem.

Readers' Comments/Questions
I quote Marilyn's comments from yesterday in total for two reasons:

"Not a geek, not a dork. Joe is the preppiest gay guy I ever met but he does it with such panache. And then throws the whole image off balance by using those little hocus-pocus needles. That's why I love him.

I would not want to be Ms. Blog Popularity. If the masses loved me that much, I'd be doing something wrong and not being true to my cranky self. Besides, as Joe says, who wants to have to satisfy the masses? I write for me and if people read it, great. If not, that's fine too."

1. She sums me up very accurately in one paragraph
2. She succinctly writes in one paragraph that which I have tried to define in multiple blog entries.

Friday, March 27, 2015

Uneven knitting part 3--fixing the loose knit column in ribbing, textures and cables

includes 8 illustrations
After a recent TECHknitting post on bunching and too-long runs, Ruth C. wrote:
When I knit columns switching from knit to purl (such as a basket weave pattern) one column is always looser-looking--I think the problem is always switching from knit to purl but switching from purl to knit doesn't have the same problem.
Judi P. followed up:
My daughter was so frustrated last year with this [same] problem with her 2 x 2 ribbing that she hasn't tried to knit a sweater since. (So sad!)
Giving up knitting? That IS sad. However, this problem is fixable. This post show 4 tricks, and one will surely work.

Solution 1--knit tighter.
The simplest quick-fix is to knit tighter. Simply using smaller needles will put so much less yarn into each stitch that the loose column of stitches will magically fix itself. This is actually an excellent solution for sweater bands--bottom or neck, and also for cuffs and hat brims. Cast on properly and knit very firmly on small needles, ribbing transforms into a stretchy, elastic fabric, with stitches laying in very smooth and even columns.

Pros and cons: While this is an excellent solution for cuffs, brims and bands, it is not a good solution for all-over textured fabrics, such as all-over ribs, basketweave, cables, etc. Tight
knitting all over the whole fabric would result in stiff, tight fabric, as well as hand cramps--not fun. Further, even for bands, casting on loosely but knitting tightly is also a trick which must be mastered for this fix to work--a tight cast on will result in a nose-scrapingly unpopular and unwearable garment.

* * *
Luckily, knitting tightly is not the only fix. There are 3 further solutions, but before we get to them, let's take a closer look at the problem.

In all the diagrams of this post, purple means the stitch appears as a knit on the "front" face of the fabric--the public side--the side which will be seen when the garment is worn. Blue means the stitch appears as a purl on the "front" face of the fabric. As you know, knitting is very
zen-- "what has a front has a back," as the Zen masters say. This means that when the fabric gets flipped over, the purple stitches, although knits on the front, will appear as purls, and the blue, although purls on the front, as knits.

In illustration 1, we are looking at the front face of the fabric. The dark purple column is the last knit column which appears just before the column of purls. These dark purple stitches are where the problem lies: This is the column of stitches which get all stretched out and floppy looking.

The first column of purls next to the knit column is dark blue. The red dots on the dark blue stitches in the first purl column show that these purls are the ones we are going to operate upon to fix the problem. That's right: The problem is with dark purple KNIT column, but in the remaining three solutions below, we are going to fix it by operating on the dark blue PURL column.


* * *

Solution 2--run out, then latch up

T
he idea of this solution to make your project working the purls and knits without doing anything different than you normally would. When the project is done, the fix comes in, and here's how.


  • Slip the stitches between one needle and the next until you are right over the dark blue column. Let down a giant (scary looking!) runner.
  • Once the ladder has been let out to the bottom of the fabric, it will be latched up again, using a crochet hook (you could also use a latch hook). As you latch the darker blue column back up, give a mighty yank on each rung of the ladder. As you can see in Illustration 2, the fabric has been flipped over for the latching process, because it is easier to latch up a knit column than purl one. By giving a mighty yank on each rung of the ladder as you latch it back up, the loose stitches in the dark purple column will tighten up nobly as the excess yarn gets yanked out of them into the stitches of the dark blue column. It is, of course, true that the dark blue column will become distorted from the excess yarn being yanked into it, as well as from the act of yanking itself, yet this is actually not so bad. The dark blue column ends up being a purl column on the front face of the fabric, which means it recedes into the fabric, and therefore will not be noticed.
A note about the illustration: The illustration shows the runner let down all the way to the bitter end, to the cast on stitch itself, then latched back up. However, it might be safer to stop a row or two above the actual bottom edge, to avoid the problem arising from the cast off untwisting.

Pros and cons: This trick is very easy and requires nothing to remember as you work on your project. However, it has three major limitations.
  • First, it works best in "sticky" fibers like the various types of non-superwash wool, because in those fibers, the stitches will stay pretty much as you yanked them. However, in slick fibers such as acrylic, cotton, bamboo, superwash wool, alpaca, silk and the like, this trick will not work very well because the fibers will slide around as you wear the item, and the excess yarn will be yanked back out of the dark blue stitches, eventually to spread out again. For slick fibers, solution 3 or 4, below, are better.
  • Second, this trick is not very good for reversible items like scarves and afghans--the distorted dark blue column of stitches will hide on one face of the fabric, but will show on the other. Solutions 3 and 4 solve this problem.
  • Third, this trick really works only if the columns to be run-out-and-latched-up stay in place, so that one column can be let out all the way to the bottom. If the loose dark purple column of stitches travels across the fabric face--traveling cables, for example--solution 4 is best.
Solution 3--latch up out of the fabric

This solution is very similar to the first, but will work on slick fabrics. Here's how:


  • The base stitch for the dark blue purl column is placed on a safety-pin or other holder at the very bottom of the work, as shown in Illustration 3. You then work the garment, decreasing the stitch count by one, and remembering not to purl that column.
  • When the knitting is all finished, turn the work over, so that you are working on the back fabric face. Now go back down to that lonely stitch on the holder waiting at the bottom. Per illustration 4, latch up the whole dark blue column, taking the rungs of the ladder right out of the fabric itself--shown in red. The red dot on the dark blue stitch just above the cast on shows that that stitch was latched up out of a ladder rung--the same ladder rungs that were red on illustration 3. Latching the whole dark blue column of stitches out of the fabric absolutely tightens up the adjoining dark purple column of loose stitches.

Pros and cons: Like solution 2, this trick works well for
cables or ribs running lengthwise (not traveling). Unlike solution 2, however, you must remember to alter your pattern. Specifically, you must remember to delete the dark blue column from your work, then remember to latch it in afterward. When using this method, be sure to swatch and measure a fully-latched-up sample, as the latching pulls quite a bit of yarn up, making the fabric narrower. For a single cable, this might not make a noticeable difference, but for multiple cables/ribs it certainly would.

Solution 4--Slipping

Unlike latching, slipping is done as-you-go. This trick is is slow to work at first, but once up the learning curve, you can knit this trick as fast as any other knitting. Unlike Solutions 2 and 3, this will work splendidly on any sort of columnar-based fabric, even short columns like basketweave, and even columns which wander, like traveling cables.

The essence of this trick is the same as solution 1--knit tighter--but with this trick, the tighter knitting is confined exactly to the point it is needed: the dark blue purls alongside the dark purple column of loose floppy knits. Here's how, assuming a 2x2 ribbing in circular knitting already cast on your needles:


  • Round 1, step a: place marker * K2 (light purple, dark purple). Per illustration 5, Slip next st (first purl stitch--darker blue) with yarn in front. Slip the stitch "open," that is: purlwise, not twisted. Step b: P1 (second purl stitch--lighter blue). Repeat from * all the way around first round. The slipped bar which results in front of the dark blue first purl stitch is shown in red in illustration 6.


  • Round 2: starting from marker *K2.Move the running yarn out of the way. In illustration 7, it is shown pulled straight up. Once the running yarn is pulled out of the way, fish around with your right needle and draw the bar (bar=red yarn slipped on the last round) through that first purl stitch, in a manner which purls the stitch with the bar (ie: do not twist the stitch OR the bar, just draw the bar through the purl from front to back as shown). Next, bring the running yarn back into play, and use it to purl the second purl stitch in the normal fashion. Repeat from * all the way around. If you look at your fabric, you will see that by using the bar to purl the first stitch in the purl column, rather than the running yarn, you have set up the running yarn to be the bar for the next round, as shown in Illustration 8. In other words, in every round, you use the bar remaining there from the slip in the previous round to actually purl the stitch, and you set up a new bar for the next round by simply slipping running yarn across the dark blue column rather than purling with it as is normally done. One more note: the red dot on the dark blue stitch in illustration 8 shows that stitch was created out of the bar illustrated red in illustrations 5, 6 and 7.
  • Repeat round 2 over and over again for the rest of the ribbing.
  • For the very last round of ribbing before bind off, draw the bar through each first purl stitch of each purl column AND THEN PURL it with the running yarn (2 st worked in dark blue purl column).This corrects the row count so that the dark blue column has the same number of rounds as all the other columns.
  • Bind off or continue in a different pattern, as desired
After you work this sample, you will see how to adapt it for ribbing other than 2x2 and for cables, etc.--basically, the first stitch in the dark blue purl column the one being operated upon by slipping as set forth in the instructions for round 2.

The idea is to avoid putting excess yarn into the fabric in the first place. By slipping the stitch, the resulting bar puts into the fabric only a small portion of the yarn a full stitch would add to the fabric. Pulling this short length up into an full stitch on the next round tightens the adjoining knit stitch by permanently yanking the excess yarn out of it.

Pros and cons: For improving all-over ribbing or for all-over cable or basketweave patterns worked in the round, this is the best trick I know. Although this requires close attention to go up the learning curve, this slipping trick can become quite fast--second nature, actually, if you work at it. However, even this nifty trick has its limitations.
  • First, in thin or splitty wool, or in poor light, or on dark colors, catching the slipped bar below can be frustrating.
  • Second, in back-and-forth knitting, the bar of the slipped stitch is on the back fabric face (away from you) on the return trip, because the purl column, as seen from the back face of the fabric, is a knit. Catching a bar from the back and leaving a new bar back there is frustrating, and isn't ever going to be as fast as catching a bar stranded across the front. Therefore, this trick really only works in circular knitting. For back-and-forth knitting, solution 2 or 3 will work better.

Geek notes
For those that want the nitty-gritty.
  • Combining techniques: solutions 2 and 3--latching--are bad ideas if the column to be latched up is going to tangle with the garment shaping. However, on a sweater with cables running up the length, where the cables first become involved in the garment shaping at the neck or armhole edge, you can work your project as far as the shaping, then latch, and then switch to solution 4--the slip method--once the shaping starts.
  • In all the solutions except for 1, the excess yarn is yanked out of the loose floppy stitch once the the knit stitch concerned is off the needles. This removes excess yarn in a manner impossible if that stitch was prevented from shrinking by being forced to stretch over the barrel of the needle. In other words, neither yanking hard on the loose knit stitch nor on the following purl stitch will work to eliminate the excess yarn, because the barrel of the needle prevents either from shrinking down past the size dictated by the barrel's diameter. Once released from the needle, however, giving the loose knit stitch a mighty yank (whether delivered by latching or slipping) will tighten it up tidily.
  • Solutions 2 and 3--latching--are cousins to CHM--the Crochet Hook Method--for tightening up loose left-leaning decreases. Solution 4--slipping--is cousin to Cat Bordhi's "hungry stitch."
  • Other solutions are possible through changing the stitch mount and also through twisting the dark blue purl stitches. However, stitch mount, twisting and the related subjects of combination- and other alternative types of knitting are being put off a future series of posts, so those solutions are not included here.
A BIG thank-you to Carol (Rududu) and to Jane (Maidenhair) for test-knitting Solution 4.

* * *

This is part 3 of a series on uneven knitting. The first two posts are:
Fixing uneven knitting part 1: stockinette fabric--how to tame "rowing out"
Fixing uneven knitting, part 2: bunching, big stitches and lumpy fabric--the problems of too-long runs.

--TK
You have been reading TECHknitting on: purl after knit, tightening up the loose stitches.

Presidential Election Prediction


I know the election is more than a year and a half away, but I wanted to make my prediction now.

I predict that the 2008 presidential elections will have the lowest turnout of any presidential election in U.S. history

Here's Why
None of the candidates on either side of the aisle have any poll-magnetism.

Think about it. On the Democratic side, you have:

Clinton - Outside of the Northeast, even Democrats seem to hate her.
Obama - No experience, and it takes more than "likeable" to get voters to the polls
Edwards - Same likeable factor, without as much magnetism as Obama

On the Republican side, you have:

Giuliani - He's way too liberal for the conservative voting block
McCain - He's pissed off Republicans with his support of the war
Romney - Conservative Christians would rather hang a cross upside down than vote for a Mormon

So, unless something completely unforseen happens, like Jeb Bush joining the Republican candidates, I think most Americans will sit home on election day 2008.

Current Knitting
Despite having to carry around eight different colors of Araucania, I decided to bring the Colorblock Cardigan to Massachusetts with me this week.


As you can see, I've finished the left/front side, and now it's time to start the right/front side. For those of you that like to see the "ugly side," here is the required reverse side photo.


I've always enjoyed intarsia, and this simple pattern with rich, interesting colors, is making the current project enjoyable to knit.

By the way, Twist is having an intarsia workshop with Lisa Fuelleman on Sunday, April 15th from 1:00 to 3:00 for anyone interested. I've never taken a class with Lisa, but I know her from my Simply Knit days, and she's a real sweetheart for anyone that's interested.
Jealousy and Envy

Envy is a feeling about what others have which we do not have. Jealousy is a feeling about what we have which we want to keep for ourselves. Envy is a desire to possess what another has and jealousy is a refusal to share what one possesses.

Blog Envy
Blog friend Franklin has made a meteoric rise in the knit-blogdom, and rightfully so. His writing is clever and witty. He is very ingratiating to his readers and to other bloggers. And he has volunteered his ample talents of drawing and design to causes such as the Knit Blog Awards and the Knitting Olympics.

Having just heard Franklin guest-host the Cast-On podcast, created and hosted regularly by Brenda Dayne, I have to admit, I grow more and more envious of his talents each new thing he does.

Don't get me wrong, I'm grateful to have a very intelligent, funny and creative readership, and I would find it overwhelming to have to satisfy the masses that read more popular blogs, like Stephanie's and Franklin's.

But I still envy Franklin his talents and humor.

Current Knitting
Since Fredda questioned whether my nice, shiny, new knitting needles actually worked, I decided I needed to take them for a test drive.


I used the largest set of needles (US17) and worked with the nylon/acrylic ribbon I got on clearance at JoAnn's last week. The needles worked perfectly fine, and I will definitely use these needles in public as much as I can.

I wouldn't want anyone thinking I was a geek just because I knit in public. These needles should take care of that.

Readers' Comments/Questions
Regarding my lunch with Lucy Neatby, Mama Lu asks, "Speaking of which, what colour was her hair?"

It was royal blue and purple, and quite lovely.

Regarding the faux rib hat, Seanna Lee asks, "The hat looks fairly thick. Does this slip stitch pattern make a nice thick warm hat or more of an early spring hat in the yarn you used?"

I used a US5 needle and worsted weight yarn. The result was a dense, thick fabric that is warm and holds its shape.